Blog 1 – Introduction

Blog 1 – Introduction

I started playing the cello seriously in 1971 when I was 22 years old. I had played somewhat earlier, but had very few lessons and was certainly not even considering music as a career. When I went to college I thought I was going to be a doctor, and I majored in anthropology and linguistics. It was only when I finally recognized that I really didn’t want to pursue those career goals that I decided to “try” this music thing. When I went to Freiburg, I played for cellist Marçal Cervera, who ultimately became my teacher. He heard me play, and told me that there was “no way” that I could be accepted into the Conservatory. I just didn’t have the technique or background to make that possible. But he suggested that I study with a student of his, and that I should come back after a year and he would see what progress I had made. We essentially started from scratch – literally!  Open strings, basic technique, tone production – and Feuillard.  We started with the No. 32 bowing exercises – working on creating a “sound concept”, understanding how the body works most efficiently, and learning how to be relaxed while playing. I came back after a year and did the Aufnahmeprüfung (Entrance Exam) for the Conservatory, and – lo and behold – I was accepted. I then studied with Maestro Cervera for 4 years and on graduation became principal cellist of the Orquesta de Las Palmas in Spain. The rest is “history”…

Fast forward almost 50 years from my Freiburg days, and I am thankful that I was given such a solid basic foundation for the right hand, and a thorough understanding of bow usage. The bow is where the artistry lives in playing a stringed instrument. As an artist one must be able to control every aspect of the bow as we work towards our artistic goals. But we must first master our craft on the way to becoming artists. We must know all the elements for controlling the bow to produce the rainbow of colors that we need in music.  We need to be able to get a good sound from all parts of the bow, and to play with accurate rhythm. We need to know about bow distribution, how to play legato, detaché, spicatto, sautillé and all the other strokes. And we need to know how to shape phrases. We need to be able to sing with the bow, and also to speak with it.  In short we need to be able to control the bow, rather than having the bow control us. If the bow is a horse, and we are the rider then we need to control the horse, not vice versa.

I have been teaching the cello for about 45 years, using the Feuillard Daily Exercises in my private applied lessons since the very beginning of my teaching.  I use almost all parts of the book, in addition to a healthy diet of etudes (Dotzauer, Lee, Duport, Popper, Franchomme, Piatti, Servais and others). For the left hand I use the book’s 2 octave and 4 octave scales and arpeggios for basic left hand organization, as well as the thumb position scales and arpeggios (No. 26-27). I also use the shifting exercises (No.16),  the position-changing exercises (No. #3-7), as well as the trill exercises,  and virtually all the other sections as warm-up exercises for my students and for myself. The advantage of the Feuilliard is that it has all of these exercises in one book, and it is brilliantly organized.

This blog will focus on how I teach bow technique using the Feuillard Daily Exercises No. 32-36. It is an example of what I call the Sequential Method of teaching, which I will discuss further in Blog 2 of this series.

For this blog I am assuming that a student comes to me having already played for a few years as a beginner or intermediate cellist. He/she may be a middle school or high school student who has started in a public school or Suzuki environment, perhaps with some private lessons. He/she enjoys playing and wants to be more serious about music and become a better cellist. I expect these students will practice at least 1 1/2 hours a day (I always have a sit-down commitment discussion with the parents and the student prior to the first lesson).

I also use these bowing exercises with incoming college students who may already play on an advanced level, but have little understanding of what they are actually doing. Sometimes they have “holes” in their technique or need to move a step backwards in order to rebuild the foundations of their technical understanding. And I use these Feuillard exercises with my graduate students (performance or pedagogy) who will be teaching students themselves. Virtually all musicians nowadays need to be passing their skills on to the next generation. In addition, I use these exercises as my own daily warm-up!

After showing a student the basic elements of the bow (essential sound production, parts of the arm, the Three Principles of Sound Production, etc) I start to explain how the Feuillard exercises work. They consist of a theme and then a page of variations that focus on various elements of bow technique. There are five pages of variations, each with a different theme:

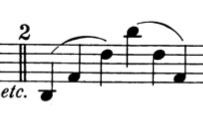
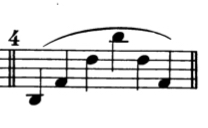
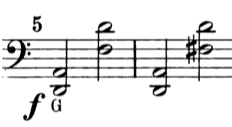
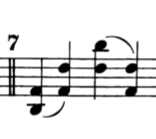
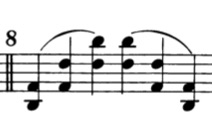
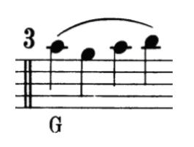
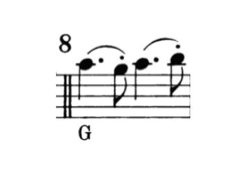
  1. No. 32: The theme of Feuillard No. 32 is all in first position. It is perfect for the student to solidify the basic technical issues of the bow. Each variation should be polished like a gem and  “perfected” with good sound and a “mastery” of the fundamental bow technique. Terms should be clearly understood, including the difference between spiccato and staccato, and the importance of a well-executed detaché or legato.
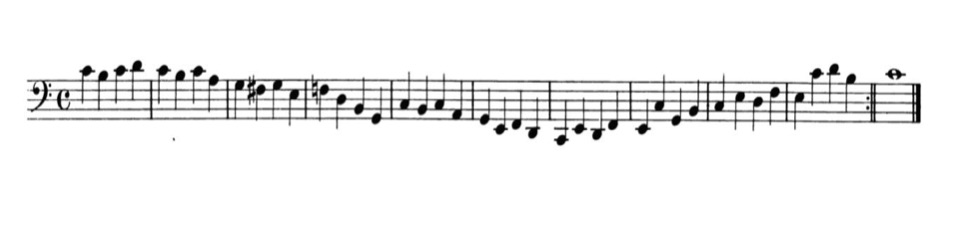
  2. No. 33: The scalar theme of Feuillard No.33 adds some complexity by going up to fourth position. This means that the student has to be aware of the contact point going closer to the bridge as the string length is shortened to achieve the same sound as in first position.  The variations in No. 33 provide opportunities to work on playing with more notes in a bow (son filé) while keeping the sound full and rich throughout the bow and on all the strings. It also builds on various techniques from No.32 (dotted rhythms, sautillé, up-bow staccato), as well as issues of coordination and ease of playing.
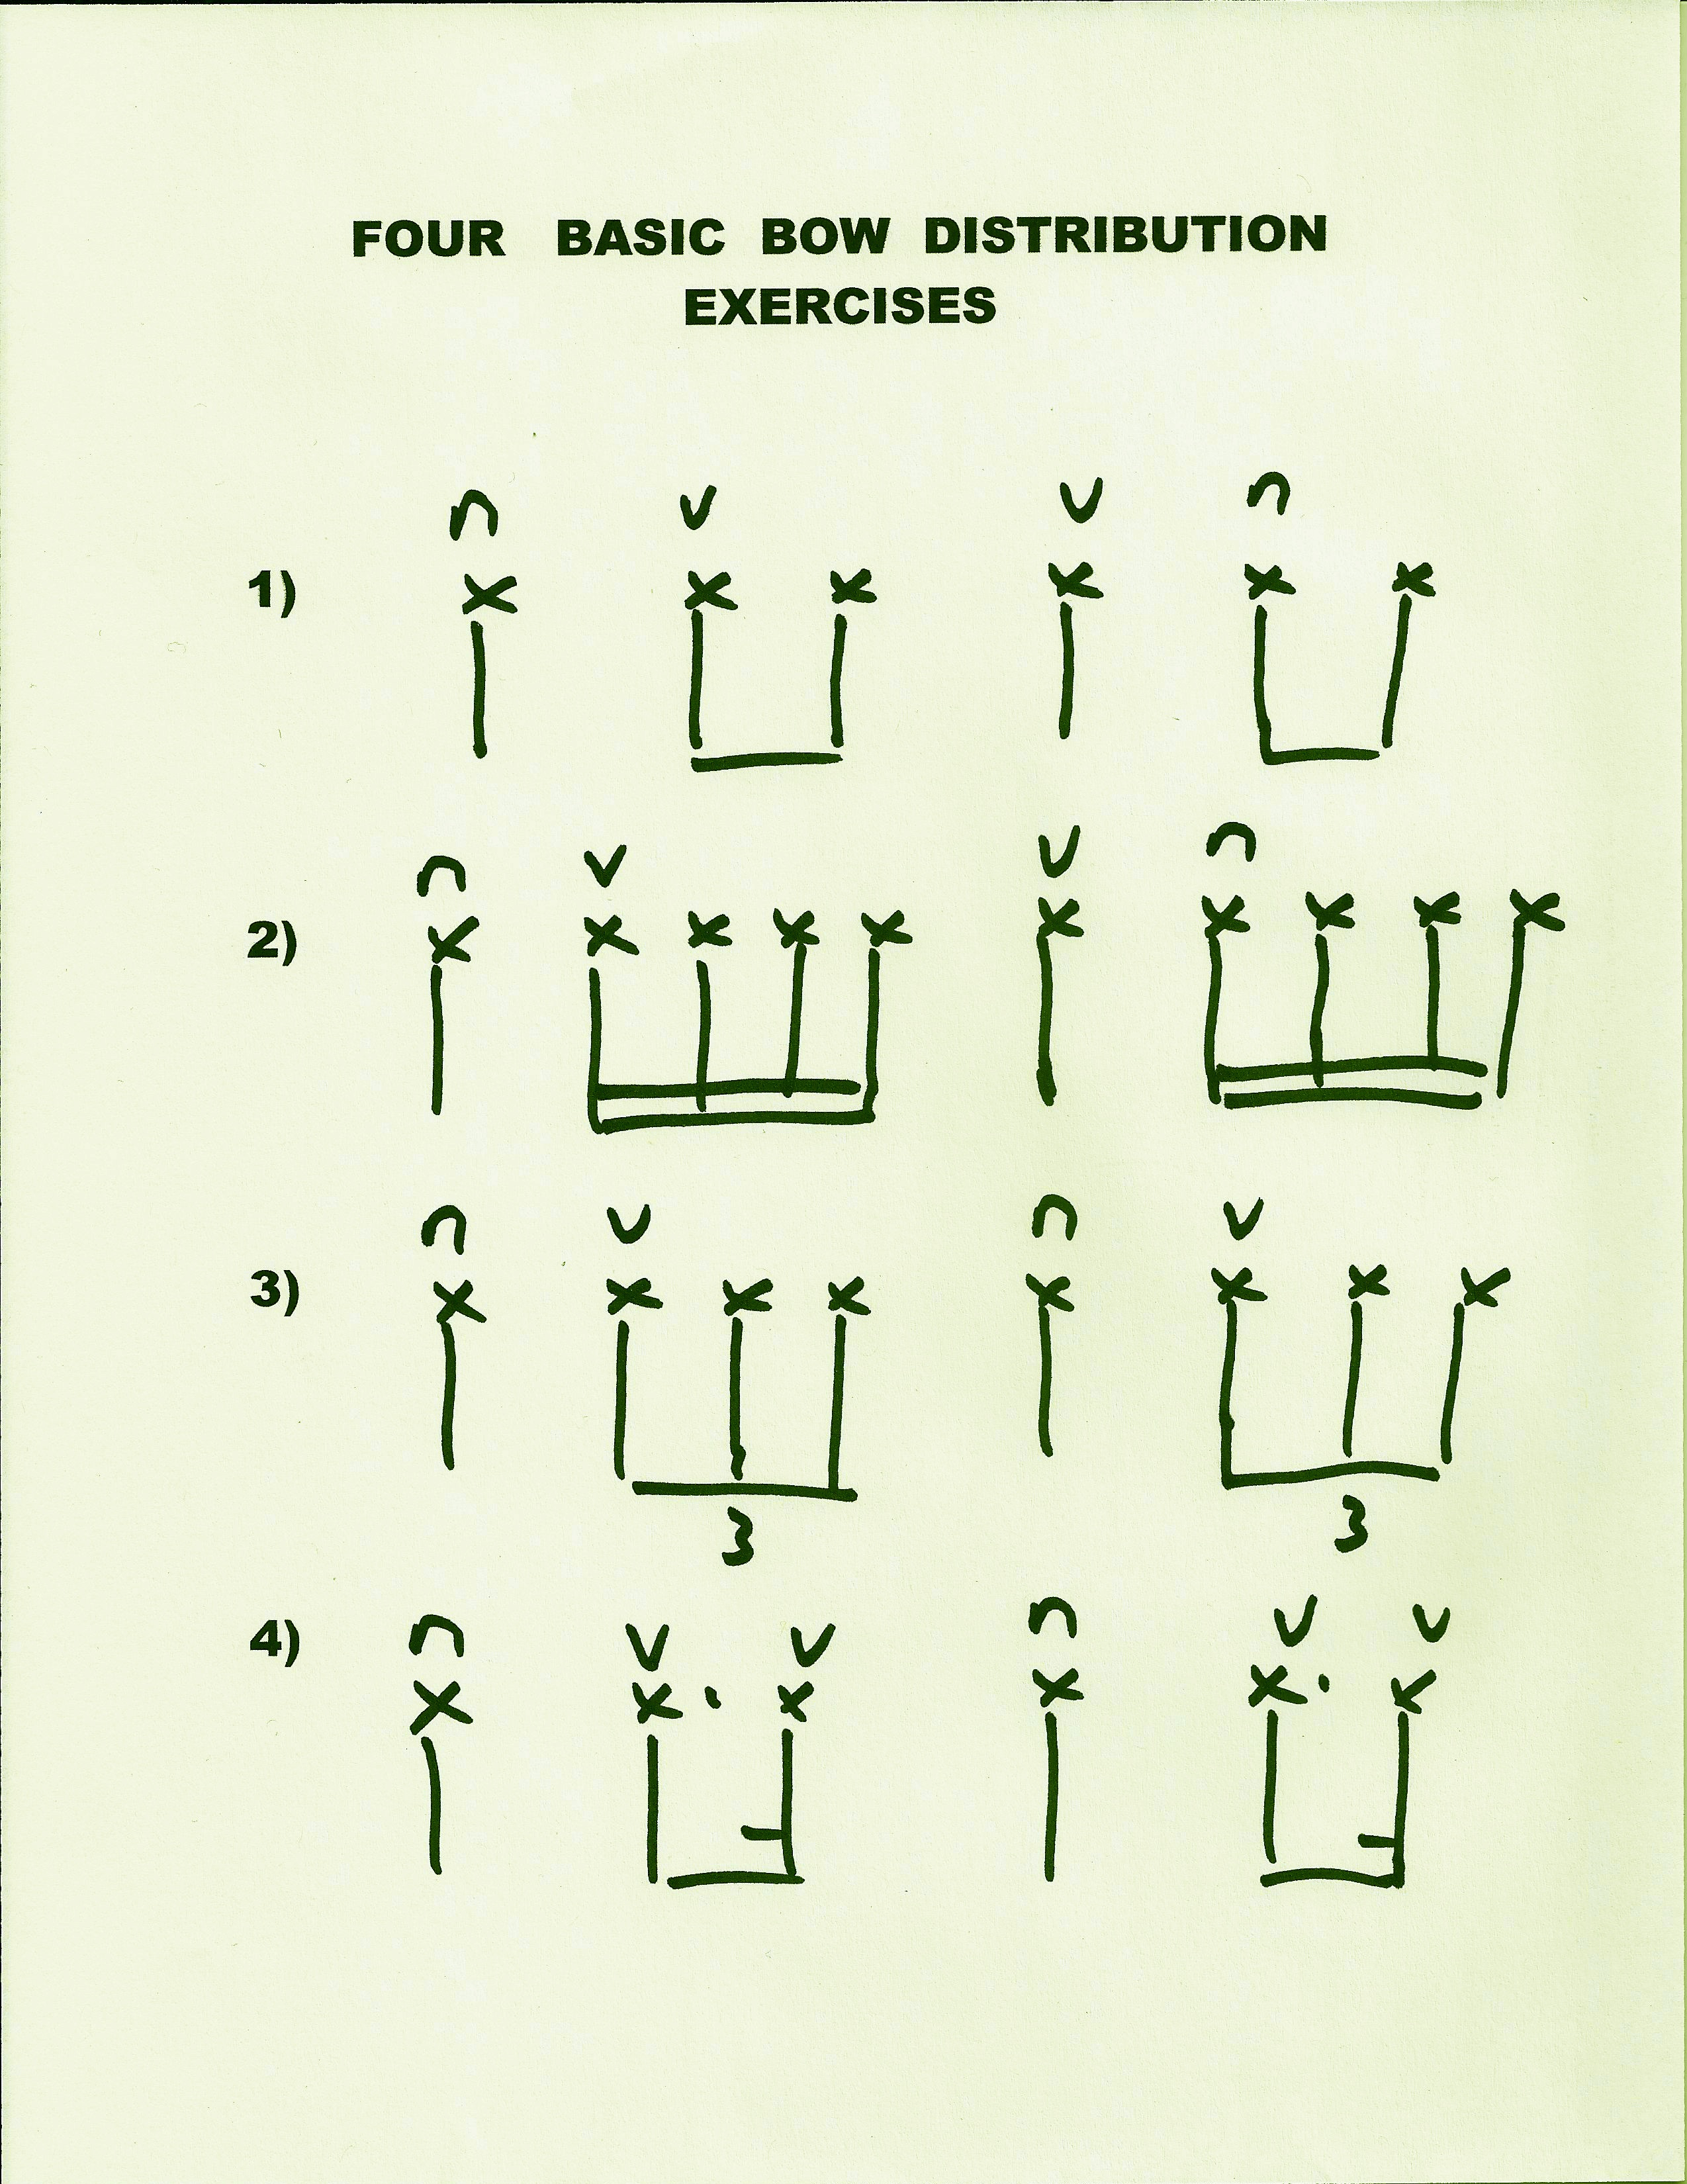
  3. No. 34: The next three pages (Feuillard No. 34-36) all deal with string crossings as the main topic, with No. 34 using 2 strings, No. 35 using 3 strings, and No. 36 using 4 strings. Cellists (and other string players) must understand how string crossings work.  If players do not use the arm in an ergonomically correct manner, then string crossings can become a major source of tendonitis. Besides understanding how the various joints of the arm move (e.g. ball and socket vs. hinge joints) the string player must understand that all of the complicated string crossings boil down to four basic bowing figures: the Arc, Circle, Figure 8 and Wave.
  4. No. 35: I use Feuillard No. 35  to explore the use of a “twist” motion: the pivoting of the body core around the pelvis to assist playing on the upper versus the lower strings.
  5. No. 36: Feuillard No. 36 deals with four strings – chords, twist motion, and a summation of all the techniques from the first four pages.

It usually takes about 2-3 years to get through all five pages, depending on the student. But by the time they finish, they have a good understanding of the bow and how the arm works. All along they are using these techniques in etudes and repertoire, and other exercise books such as Sevcik.

In this series of Blogs, I intend to demonstrate how I teach French bow technique using the logical, sequential material in Feuillard. These Blogs essentially comprise a syllabus for teaching the Feuillard – showing the pedagogical intent of each variation.

For these Blogs I have asked several of my pre-college students if I could video-tape their lessons and use clips of my teaching and their playing in the lessons to demonstrate the process. These are not “staged” – they are taken directly from actual lessons. I would like to thank the students, who are helping to make this Blog possible in this way. The students are:

Caroline – to be featured in the videos of No. 32

Iestyn –  to be featured in the videos of  No. 33

Tristan – to be featured in the videos of  No. 34

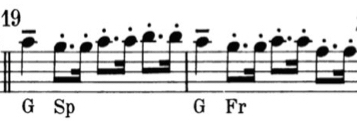
Zach – to be featured in the videos of  No. 35

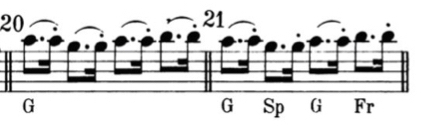
George – to be featured in the videos of  No. 36

This series of Blogs is intended for cello teachers who wish to become more organized in the way that they teach bow technique. It is also intended for cellists young and old who want to explore and improve their own right hand technique, beginning with fundamentals and working through sophisticated uses of the bow.

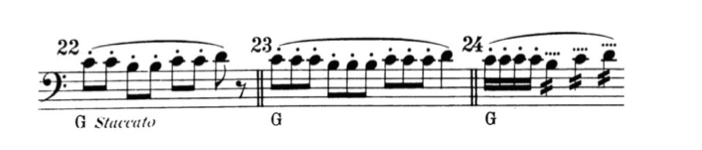
These Blogs originally came out every Monday on CelloBello over a period of a nine months. In the next Blog I will discuss the underlying pedagogical and philosophical concept of the Sequential Method, which forms the basis of my way of teaching.

test

Blog 2 – The Sequential Method

Blog 2 – The Sequential Method

Blog 2 – The Sequential Method

I believe that it is important for an applied cello teacher to have an organized and logical pedagogical system in order to ensure that intermediate level students are exposed to all the technical and musical information that they need. Just as a math teacher or an English teacher uses a syllabus to create a logical succession of tasks for a young student, the applied studio string teacher should have a clear methodology to insure that all the requisite material is covered and that the student builds a secure technique based on a solid foundation. Very often I hear cellists play who clearly have “holes” in their technique or in their understanding of how the body works. They may never have analyzed how string crossings work, or know which part of the arm is active and which part is passive in playing a sautillé stroke, or how to use ballistic motions to their advantage.

There is so much material for a young musician to learn, and if the intermediate level teacher is not well organized then some important material may be left out or forgotten. Far too often string teachers neglect to cover important topics, thus leaving their students with major holes in their cello understanding and development. The teacher needs to have a “grand design” in taking the students through what they need in an organized sequential manner. If not, then the student may be missing the solid foundation required to continue building technique, repertoire, understanding of style, endurance, memorization, concentration, performance experiences, and a career.  These teachers fail their students with what I call  “random teaching”.  They just teach a piece and work on whatever technical issues happen to appear at the moment.

I remember being shocked a few years ago when a Freshman college student came to me after having studied with the principal cellist of one of our major orchestras. This student was proud of having worked with this excellent cellist for several years, but had no idea about all the essential elements that were missing in his playing and in his basic understanding of the instrument. It was a shock to him when we started going through the fundamentals of cello technique, and when he realized how much he didn’t know. Very often I hear auditions in which a young cellist might play a Popper High School etude that he/she prepared specifically for the audition, but this student may never have played a preparatory etude by Lee or Duport or Franchomme. Or even the Popper Op. 76 “Intermediate” etudes.

Sometimes it seems that cellists who are themselves excellent players teach “improvisationally”, reacting to whatever a student brings in to the lesson rather than leading a student through a well-thought out, logical approach to technique, etudes and pieces. This may be because excellent players often have forgotten how they themselves were taught. Or it could be that they just teach lessons in order to earn a few extra bucks, after hanging up a shingle saying “Cello Lessons, $150 per hour”.

There is certainly a place for this kind of improvisational teaching  – e.g. a one-time master class situation, or a student coming in for a sample lesson, or occasionally as the situation may warrant with a regular student. Certainly a lesson in which a master artist is working with an artist-level performer may fall into this category of improvisational or inspirational teaching.  However, if an artist-teacher says “play this passage like a rainbow” and the student has no idea how to make something sound like a rainbow because they don’t know how to control the bow or change the color of the sound, then there is something wrong. If a teacher is responsible for the development of a student over a period of time, I think it is important for the teacher to have a clearly thought out plan for that student.

According to the philosopher Alfred North Whitehead, “the rhythms of education are in three stages: romance, precision and generalization.” Studies of successful performers have shown that many of them have been taught by a succession of teachers who embody these three stages. The beginning teacher nurtures the romance of the instrument and the joy of music; the second teacher is the technician who helps to build technique and instill discipline; and the third teacher is the artist-teacher who is able to inspire the student to artistic heights and may be more of a coach.

This country has wonderful teachers in the first category, including in public school and Suzuki programs, who help to nurture young musicians. These teachers spread the joy of playing a string instrument, and provide the basic technical information that these young musicians need. We also have fantastic artist-teachers who fit into the third category. These are teachers at major conservatories, as well as performers in orchestras, chamber groups and orchestras who serve as inspirational teachers and coaches. However I feel that we are lacking teachers who serve in the second category mentioned above. These are the teachers who can delve deeply into the details of playing an instrument, helping to build the craft of playing an instrument,  while instilling self-discipline and technical competence on a high level. These are the teachers who guide a student through a healthy diet of scales, arpeggios, etudes and appropriate repertoire. Their role includes building good work habits, demanding high standards, expecting consistency, and providing a thorough understanding of left-hand and right-hand techniques.

This Blog will focus on the work of the second category of teacher, and specifically on how a teacher for an intermediate level student can build a student’s bow arm through the Feuillard Daily Exercises. These bowing variations are a perfect example of a logical and sequential approach to teaching bow technique. For me, the Feuillard is our cello “bible”.  It is set up in an organized manner as a kind of syllabus for the bow.  Feuillard No. 32 is all in first position, and it deals with basic bow control issues. No. 33 adds some complexity by going up to fourth position, and it requires an understanding of contact point issues and son filé, in addition to building on various techniques from No. 32. The next three pages (Feuillard No. 34-36) all deal with string crossings as the main topic, with No. 34 using 2 strings, No. 35 using 3 strings, and No. 36 using 4 strings. Understanding string crossings is one of the most important tasks for cellists. If players do not use the arm in an ergonomically correct manner, then string crossings in particular can become a major source of tendonitis.

However as with any method it is up to the teacher to be able to present the material in a productive and consequential manner. The teacher must completely know and understand the technical information, and he/she must be able to communicate it effectively to the student. The teacher should be able to anticipate the issues involved, and have several different ways of solving the problems that may occur. The teacher needs to be able to demonstrate adequately. The teacher needs to be able to set high standards for the student. And the teacher needs to know when to ask a student to repeat something, and when to move on.

We expect our students to be disciplined and to practice efficiently and effectively, but similarly we have to be disciplined in how we best use our time with the student in the lesson. Since most students come just once a week for an hour lesson it is vital that the hour is used to the fullest. For me a typical lesson will be divided into four parts: scales and arpeggios; bowing exercises; etudes; and repertoire. In the beginning of each semester I put more focus on the beginning parts of the lesson; as the semester continues there will be more attention on the etudes and repertoire. But throughout I will try to “hit” each part of the lesson for at least a few minutes. If not, the student will likely not practice whatever I don’t hear in the lesson.

Teachers have their own style of teaching, and their own approach to pedagogy and technique. However ultimately it is the responsibility of every teacher to cover all the necessary material in one way or another. The Feuillard is our “vade mecum” that insures this coverage.

My goal in this series of blogs will be to demonstrate how I teach bow technique. I will describe the pedagogical intent for each variation, and use video examples from actual lessons with my pre-college students. This series is intended for teachers, for advanced players who wish to improve their own bow technique, and for amateur players who want to explore some of these concepts for themselves.

In Blog #3 we will start with some fundamental techniques which cellists need to know before beginning the Feuillard. These include the “core” sound, the “block of sound”, how the different parts of the arm work, the Three Principles of Tone Production, and the all-important concept of Left/Right Motion.


Blog 3 – Preliminaries

Blog 3 – Preliminaries: The first lesson

As I mentioned in the Introductory Blog (#1), I am assuming for this series that I am working with an intermediate level student, building or re-building his or her right hand technique. This may be because this student has a poor basic sound, is playing with too much tension, or doesn’t understand the mechanics of how the body works in playing the cello. With more advanced students it may be because they have never really analyzed or thought about various aspects of bow technique, and as a result they are deficient in executing different strokes or rhythms or styles.

The first step, starting in the very first lesson, is to make sure that the student understands the basic principles of the bow arm. These include knowing the difference between a “core” sound and a “resonant” sound, knowing the “Three Principles of Tone Production” (Contact Point, Weight, Speed), and knowing where the fingers go on the bow and what the function of each finger is on the bow. They must know how to play with a “straight bow” (i.e.- the bow parallel to the bridge), having figured out how it feels to keep the bow moving at the correct angle, and having an understanding that a “straight” bow is something of an optical illusion from the perspective of the player’s eyes. They must be able to play with a “block of sound”, meaning controlling the same sound from the frog to the tip. They have to know the different parts of the arm and how they control the bow. And they have to understand the basic concepts of balance and coordination in playing the cello. All of this preliminary information can be covered in one or two lessons, before getting into the actual Feuilliard exercises.

I usually start by asking the student to play an open G-string. I watch the student to see if he/she is using the full bow and to hear if he/she is getting a good sound. It tells me a lot about the player – what kind of contact point they choose; what kind of sound they use; will there be a sense of pulse; will they use the arm correctly; how is the bow hold, etc etc.

Then we start in. First of all I usually ask for what I call a “core” sound. The following video clips are taken from my very first lesson with Caroline, on August 2, 2018.

The reason that I ask for this “core” sound in the beginning is that this is the sound which will project in a hall. The cello often has a problem with projection, and the “core” sound has little barbs that can help reach the back of a hall. The opposite of a “core” sound is a “resonant” sound. We use the core sound for something like Dvorak concerto; we use the resonant sound for something like Bach (vast over-simplification, but I hope you get the point!). The other reason that I ask the students to practice playing with this kind of sound first is that it is more difficult to produce – hence they need to practice it. Most students like the pretty sound that is produced with a higher contact point (further from the bridge), and that is easier to produce. But they have to train themselves to play with the core sound. And, as I said in the video, playing with this core sound on the open G-string helps to change a student’s “sound concept” very quickly. When I do this exercise in master classes or clinics students come out of a session with a completely different understanding of tone production and the sound that they are producing.

The next concept is to play the open string with what I call a “Block of Sound”.

The reason I use the open G-string at first is that the arm in the most natural position on this string – not too high or too low. It is a good starting place for feeling arm weight (even though I haven’t talked about that just yet). Soon after the first lesson I will ask the student to do all the other open strings in order to figure out the different properties of each string and what will be required to get a good sound. But it is best to specialize on the G-string in the first few lessons, until the student has internalized all of the fundamental issues.

Now we need to refine the sound at the beginning of the stroke. This is especially difficult on the G and C strings on the cello because of the size of the string. I ask for a “ke” sound, and show the “Getting into the String Exercise”:

Next we need to start to understand the physical motions involved in playing with the bow. For this I identify the Four Parts of the Arm. These different parts of the arm will be used for everything from string crossings to sautillé, and the cellist must understand intellectually and kinesthetically which part does what.

The four parts of the arm for cellists are: the upper arm, the lower arm, the wrist and the fingers. In later lessons we will isolate each part of the arm, with various exercises to sensitize how the different parts work.

First we need to start to explore which part of the arm controls which part of the bow when playing from the frog to the tip:

I like to have the student say the part of the arm as they are playing because speaking involves a different part of the brain – so it is kind of like multi-tasking, which in this case is a good thing. It involves coordination, and it checks to see if the student is having to think so hard about the arm motions that there is no brain power left to actually speak. I use this technique a lot in training physical motions (e.g. saying the names of the notes while playing, or telling me their telephone number while doing a vibrato exercise).

So, from the frog to the middle of the bow we use the upper arm; from the middle to the tip we use the lower part of the arm. Or, another way of saying that is:

“the upper part of the arm controls the lower part of the bow; the lower part of the arm controls the upper part of the bow”.

I like to put these technical concepts into little formulas or mantras that a student can repeat – and I usually quiz them on these quotes in subsequent lessons to see if they have learned them deeply.

The next concept involves how the elbow works when going from the frog to the tip:

You will notice that I like to ask lots of questions in the lesson. I find that rather than just giving the students the information, it is better to ask them to try and figure it out for themselves. This is the ancient Socratic Method (or the Talmudic Method) of learning. At first some students may find this unusual and perhaps uncomfortable, since they are often used to teachers just telling them everything. They may be shy at first, but as they get used to this system they often start asking themselves questions and then finding answers for themselves.

The next concept that needs to be addressed involves the angle of the bow. In order to keep the same contact point, so that the sound doesn’t change unwittingly, the bow must be parallel to the bridge (or perpendicular to the strings):

In the next blog we will continue with preliminary information from the first and second lessons, including the the “Three Principles of Tone Production”, the concept of balance, and Left/Right Motion.

Blog 4 – Preliminaries (Part 2)

Blog 3 presented preliminary concepts which are necessary before starting the bowing exercises in Feuillard. These include the “core” sound, the “block of sound”,  playing with a “straight” bow, and a basic kinesthetic  understanding of how the bow arm works (the correct movement of the upper and lower arm, and the elbow). These are all issues which should be addressed in the very first lesson with a new student. I spend a lot of time working with the bow arm first, because if a student can’t get a good sound with the bow it won’t matter how beautifully the left hand works. Basic sound production comes before addressing the myriad number of left hand issues involved in playing the cello (intonation, vibrato, shifting, articulation, coordination, double stops, etc.).

Although we are focusing on the bow in this series of Blogs, that first lesson would also include some basic information about the left hand, including the shape of the fingers on the fingerboard,  knowledge of how the position numbering system works, and how to check first position (first finger  with the string above creating a perfect 4th, and the fourth finger with the string below creating an octave). I also explain the initial scale system that we will use – two octave scales (Feuillard #10) and two octave arpeggios (Feuillard #11). I have specific pedagogical goals with these left-hand issues in the first lesson, but that is outside the scope of this Blog. Perhaps when I am done with this series I will continue with another series of blogs on the left hand…

So, continuing with the preliminary information that should be presented in the first two lessons, we will explore the Three Principles of Tone Production, the placement and function of the fingers on the bow, and the “all important” concept of contrary or “Left/Right” Motion.

In Caroline’s second lesson I presented the Three Principles of Tone Production, which are:

  1. Contact Point – where the bow is placed on the string
  2. Weight – meaning how much arm weight we use on the bow
  3. Speed of Bow – how fast we move the bow

These Three Principles are the most important elements for producing sound and for changing the color and volume of the sound. Learning to control these Three Principles is one of the most basic tasks for a string player – and yet it is among the most important parts of the journey of artistic discovery for seasoned professionals as well. As cellists we are continually searching for new colors in our playing and for better control of the bow. And the search never ends…

In Caroline’s third lesson we reviewed the Three Principles that I presented in the second lesson, and then discussed some of the “rules” which can help in sorting out how the three Principles interact:

The cellist must internalize these basic “rules” – we don’t exactly have to memorize them, but we do need to absorb them so that we can produce the sound we want and respond quickly if the sound that comes out is not what we want. Some of these important rules are:

The lower the string, the more weight we need to use.

The closer to the bridge, the more weight we need to use.

The lower the string, the slower the bow speed we need to use.

The faster the bow speed, the higher the contact point we need to use.

The higher the string, the lower the contact point we need to use.

The higher up you play on a string, the lower the contact point we need to use.

Most young cellists are not aware of the difference between passive arm weight and applying  pressure on the bow.  So I usually have to help them become sensitized to the feeling that the weight of the arm is enough to create a big sound. They must recognize that pressing the bow onto the string will be counter-productive.  A few exercises can help them become aware of the importance of arm weight.

I usually address the actual bow “hold” only after the student has started working with all these other elements.  I find that it is better for the student to absorb these preliminary concepts and recognize the immediate change in their sound and ease of playing. I find that it is psychologically helpful in gaining the confidence of new students when they find that their work is paying off right away. Making changes in their bow hold often produces less of an immediate impact, and sometimes is more difficult to change. So I prefer to delay that until the second lesson.

I don’t like to use the terms “bow hold” or “bow grip”,  because “holding” the bow implies using muscles. I prefer to say  “bow balance” – but I often end up saying “bow hold” anyway since I haven’t come up with a good, practical alternative term to use…

I divide the information about the bow hold into two parts: the “Placement of the Fingers on the Bow” and the “Function of the Fingers on the Bow”. I have found that even very advanced players are often not aware of the various “personalities” that the different fingers have on the bow. By focusing on the  individual properties or “functions” of the different fingers we have specific mechanisms to change our sound, articulation, stokes, etc.

In the third lesson with Caroline I asked her to review the information about finger Placement and Function that I had told her in the previous lesson:

So the Placement of the Fingers on the bow:

1st finger – on the grip

2nd finger – on the metal tab, with the pad of the finger slightly below the ferrule

3rd finger – on or near the eyelet, depending on the size of the hand

4th finger – the pad of the finger goes on the junction of the two woods (ebony and pernambuco)

Thumb – on the junction of the two woods opposite the 2nd finger, on a slight diagonal to the stick

And the Function of the Fingers on the bow:

1st finger – transfers the weight of the arm into the bow

2nd finger – serves as an anchor to keep the hand in place on the bow

3rd finger – helps determine the spacing of the fingers (we want approximately even spacing of the fingers. Being aware of the space between the 2nd and 3rd fingers helps determine the spacing of the other fingers; the 3rd finger is also responsible for the rotation of the bow that results in more or less hair on the string; it is also the “centering” finger, which can help with relaxation. The third finger is the most “elusive” of all the fingers, but having a good appreciation of its function helps to create a more sophisticated use of the bow.

4th finger – balance finger (very important for string crossings and off-the-string strokes). I often put the little finger on the top of the stick to help feel this balance function. We’ll discuss this further in another Blog.

Thumb – counter-balance to the other fingers; the “boss” or  “guide” finger.

It is very important to make the student aware of thumb issues right from the beginning. The thumbs should be round and flexible. The thumb on the bow is one of the major contributors to excess tension if not set up and addressed  properly.  I have found that when I work with college students whose thumbs are incorrectly bent in, even if they play quite well it is very difficult for them to change this bad habit. And if they don’t change it they are very limited with what they can do in playing fast strokes, or playing accurately.  If not corrected, the thumb can be a major underlying cause of tendonitis.

Next the student needs to explore how the little finger balances the bow and controls many of the movements of the bow:

Paul Katz tells a wonderful little story that conveys a lot of information about the fingers on the bow:

Now we are ready for one of the most important concepts for producing a good sound and making it easier to play with less physical effort: Left/Right motion (or “contrary” motion).  I usually introduce this in the very first lesson, and then expand on it in subsequent lessons. I find that when a student begins to understand the concept of balance their playing improves significantly.

There are so many issues to address with a new student. So the teacher must pick and choose the most important ones to present first. For me, the fundamental bow issues that we have discussed so far are paramount. We can then build on this technical foundation as we move through the Feuillard bow exercises. It only takes one or two lessons to present all of these concepts. But, needless to say, for most students the basic issues will not have been completely solved in the first two lessons, and I will frequently return back to the basic issues of bow angle, balance, arm weight, etc. as we work on the variations in  Feuillard No. 32.

In next week’s Blog we will start our work on the Feuillard Daily Exercises, with the theme of No. 32, and the first few variations.

Blog 5 – Feuillard #32 – Theme, and Variations #1-3

Now we are ready to start working on the Feuillard bowing exercises themselves. I usually begin explaining  how to approach the Theme and Variations in the very first lesson. But since most of the time in the first lesson is taken with all the necessary “preliminary” information about the bow (as discussed in Blogs 3 and 4), and with basic information about the scale/arpeggio system and etudes, there will be just a brief introduction to the Feuillard project in that initial lesson.

First I explain to the students how these Feuillard exercises are organized, with a theme and then a set of variations.

Theme of No. 32:

Untitled

Then I explain to them how we check for intonation using the perfect intervals. Since the students will be playing the same notes again and again, this is a great way to instill good intonation – if they are careful about checking first position. They will be training both their ears and their hands. But first they have to have a basic understanding of the intervals.

Next we go over how to check first position, using these perfect intervals, so that the students are cognizant of the hand position and basic intonation as they repeat the theme over and over in all its variations. The key to this is that we check the first and fourth fingers of the left hand in order to establish the basic outline of the hand. For most people the first finger tends to get sharp and the fourth finger tends to be flat. By checking with the perfect intervals they can organize the structure of the hand. Later we will address the middle fingers.

So the basic rule for checking first position is:

Check the first finger with the string above and get a Perfect 4th.

Check the fourth finger with the string below and get a Perfect 8th (Octave)

Now we are ready to play the full theme, paying attention to the basic intonation and getting a good sound. After a few attempts, with lots of checking, the intonation for the Theme becomes more stabile and the sound is better. At this point I need to explain to the student how the variations are going to work, with the directions for which part of the bow to use written under each variation, and the articulation written above the notes. I need to make sure that they understand the abbreviations with the explanation key at the top of the page. And I need to make sure that they understand that each variation will have a different tempo and style.

By the second lesson, Caroline has understood and internalized most of these preliminary instructions. She knows how to check first position,  has practiced the Theme and she has found a good tempo for Variation 1 – which takes some experimentation. She is using left-right motion and is getting a better “core” sound and “block of sound” than she had in the previous week – all without prompts from me. So we are now ready to start going through the variations and figuring out how to control the bow.

Variation #1:

Var 1

The tempo for Variation 1 should be thought of in the 8th note, rather than the quarter note because otherwise it will be too fast to play this variation using a full bow on the lower strings. I suggest a tempo of about 8th note = 72 or so.

For most of the video examples in this blog I will not present the student’s entire performance of the whole variation to save time and space here. However I feel that it is very important that they play each variation in its entirety  in the lessons. I treat these as “performances”. If there are too many “blips” in the lesson performance, or if they do not understand the technical issues involved, then they have to repeat the variation the following week. A variation will be “passed off” only if it is done accurately, with good sound and good intonation.

Variation #2:

Var 2

This Variation should be executed in two different ways: one way is with a high contact point (close to fingerboard) and a fast bow speed with the bow staying on the string. The second way is with a low contact point (close to the bridge) and a short amount of bow, but lifting the bow above the string and bringing it to the tip in the air. Use a similar tempo to Variation #1, thinking in the 8th note rather than the quarter note. It is important to do the left/right motion in order to get to the tip easier.  The student is practicing coordination with the left/right motion, and also figuring out one of the important body movements that make playing easier and more communicative. It is like learning the choreography of playing the cello.

Usually I explain new concepts in one lesson, and then ask the student to practice the variation remembering these new concepts. Then, when the student comes back the next week I check to make sure that they not only can play the variation, but that they remember the concepts.

The teacher must always evaluate wether it is more important to stay on a variation to “perfect” it, or to move on and address a particular technical issue in a later variation. This will depend on each individual student’s ability, personality, the amount of time it takes to get the main concepts, etc. In this case, although the staccato sound was not “perfect”, it was good enough for the moment. We will be addressing the sound more in upcoming staccato variations.

Variation #3:

Var 3

Variation #3 has four notes in a bow.  To get a good sound on this variation requires having a contact point close to the bridge. The “rule” is” The more notes in a bow, the lower the contact point.

I usually ask the student to prepare about 10 variations for the next lesson – writing in the tempo for each variation, and trying to figure out what the main “issues” are for each variation. They should be able to verbalize what it is that they are trying to do. By telling me in words what the goal is they are not only re-enforcing the information, but they are using a different part of the brain to clarify what they are doing. It is good if they can play something, but it is even better if they can tell me what the issues are and execute them well.

The next Blog will explore the next several variations, which will include staccato strokes, bow distribution, dotted rhythms, and various combinations of these tasks.

Blog 7 – Feuillard No. 32, Variations #8-11

In watching these videos, you will have noticed that I am continually asking Caroline questions. This is part of the so-called Socratic or Talmudic method of teaching, in which we ask questions rather than just telling the student what to do. The student is encouraged to consider the problem and verbalize a response. I think that this is a really important approach to teaching because we are constantly challenging the students to analyze and talk about what they are thinking. If the students can verbalize something they will understand it better, and it will be lodged deeper in their psyches. And instead of just spoon-feeding information we are helping them to figure out the answers. When students understand how important that is, and start doing this by asking themselves questions in their own practicing, then the progress can be amazing.

The next several variations in No. 32 deal with dotted rhythms, various combinations of staccato strokes, and bow distribution.

Variation #8:Var 8
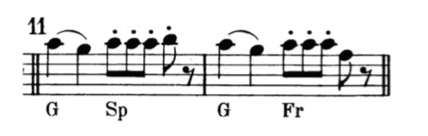
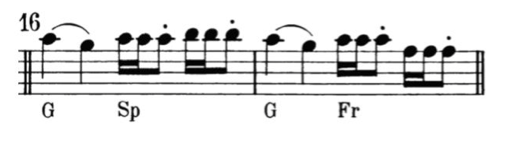
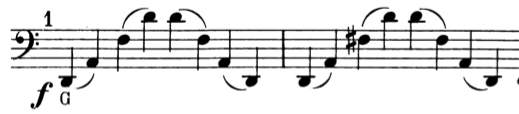
String players are notoriously bad at playing dotted rhythms. It may be somewhat easier for pianists and wind players to play this rhythm accurately because they are not inclined to sustain the ends of the notes. But we string players need to be able to surmount the challenge and be accurate in our playing of the rhythm.

Our tendency is to play dotted rhythms as triplets. The solution to this part of the problem is conceptual: subdividing into either two or four beats. If the rhythm is a dotted quarter note and an eighth note (as in this Feuillard variation) then one should subdivide into two parts, thinking of the quarter notes, or into four parts thinking of the eighth notes. In other words, we have to think “inside the beat” by subdividing. The important thing is not to divide the bow into three parts, since that will produce the triplets that we don’t want.

The next problems are physical:  stopping the bow before the short note, and making sure that the short note has enough bow speed and weight so it doesn’t get lost. The energy in a dotted rhythm is on the short note, not the long note.

I asked Caroline to do it again in the next lesson to make sure that she had really remembered all the information, and to give her some time to absorb the physical things needed to play the dotted rhythms. Feuillard No. 32 has several other dotted rhythm variations further down on the page, so this is just an “introduction” for the student. Later we will refine what needs to be done to play dotted rhythms in a more relaxed manner, and we can address some style issues. But I think it is “brilliant” of Feuillard to have introduced the dotted rhythm concept early on, in order to let a student absorb the basic concepts before digging deeper.

Variations #9 and #10:Var 9Var 10
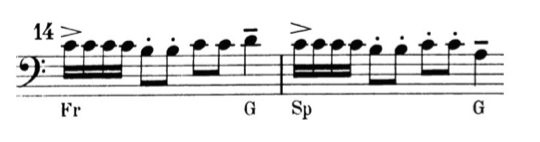
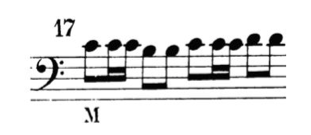
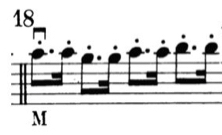
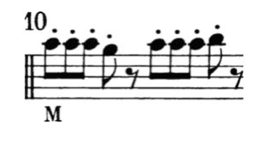
These variations work on the staccato stroke again, and are a good way to check up on whether a student remembers some of the earlier concepts that were taught, including using the right part of the bow and arm, the contact point for staccato, and “catch and float”. Number 10 is also interesting in that the rhythm switches between triplets and duples.

As I think I mentioned earlier, I am editing the videos here and cutting them short in order to save time and space in these blogs. However, the students really do play these variations all the way through in the lessons in order to “pass them off” and move on. If the performance is not clean, then they have to do the variation again in the next lesson. I feel that by treating each variation as a performance in the lesson, the students are working on more than just the technique. They are also working on their abilities to concentrate – which is a major issue for young people today.

I had an interesting experience with another one of my pre-college students. He had been having difficulties with memorization and concentration from the very first lesson. I tried lots of different techniques to help him with these issues, but after several months he was not making a lot of progress. Finally one day he came in for his lesson, and his scale and arpeggios were wonderfully memorized and in tune,  his Feuillard exercises were magically memorized, he did a great performance of his etude, and his piece had made a big step forward. I was amazed – and asked him “what happened” that he suddenly made such progress in all aspects of his playing. He scratched his head, and said he wasn’t really sure, but he said that he noticed that all of a sudden his school work was better as well. I believe that the work we had done with figuring out how to memorize things, and the concentration exercises we were doing with the Feuillard, and the self-discipline he was learning overall through the cello had a positive impact not only on his cello playing, but also on his school work. And he has continued making great progress in these areas ever since.

Variation #11:

Var 11

This variation works on bow distribution, plus staccato at the frog and tip. The idea is to match the sound of the staccato at both ends of the bow. The other main issue here involves the contact point, which needs to be low for both the quarter notes and the staccato notes. However in this case,  the contact point needs to be lower for the full bow with two notes, and slightly higher for the staccato notes, demonstrating the concept of “the more notes in the bow, the lower the contact point”. Students have to experiment with this in order to sense what is needed for a good sound.

I expect the students to write down the tempos that they think are good for each variation during their practicing. Each variation may have a different tempo.  I often ask them to “snap” the tempo before they play, so that I can see if they are imagining their chosen tempo for that variation. Rhythm is such an important basic musical concept, and these variations are helpful in addressing many of the different rhythmical issues, including tempo and pulse.  Below is a page from Caroline’s Feuillard exercises, in which she has written the tempos for the variations that she has worked on prior to each lesson. This is also part of the self-discipline that we are training. Notice also the arrows above the notes in the theme (which we discussed in an earlier blog) and Pablo Casals’ term “Expressive Intonation” which I had written in one of the first lessons, so that she is constantly thinking about how the leading tones work in a melodic line.

Caroline's #32

Next week’s blog will continue with variations dealing with the all-important detaché stroke, as well as other issues involving contact point, bow speed and coordination.

Blog 8: Feuillard No. 32 – Variations #12-17

We will continue this week with Feuillard No.32 Variations #12-17, which introduces the essential detaché stroke, sometimes colloquially called a “scrub” stroke. Detaché is perhaps our most important basic stroke, but it is difficult to execute well. Detaché means “detached” but the bow changes are connected in a somewhat legato fashion. So it should not sound “pumped” or disconnected like a staccato stroke. This means keeping the weight in the string constant, but at the same time trying to find a good “ring” in the sound.

Variation #12:Var 12

It is vital that a student recognizes how to produce a good detaché in different parts of the bow, and with different parts of the arm. This variation works on the detaché in the middle of the bow with the lower arm. I usually ask the student to play it first without the accents, in order to determine whether the stroke is consistent, with a pure, clean, even sound. Then I ask them to play the accents with both bow speed, and then using weight applied by the first finger.

Usually I explain new concepts in one lesson, and then ask the student to practice the variation remembering the new concepts. I usually assign ten or so variations, but we often only get to four or five in the lesson, given the amount of time it takes to play  through and work on each variation. As I mentioned earlier, the students play through each variation completely  because every note on the cello has a different set of properties. So even if some of the notes are sounding good, we need to make sure that ALL of the notes sound good. It is also a good concentration exercise for the students. Of course in this blog I am editing the video to save time and space by cutting part of the playthroughs of each variation.

At this point I want to do some exercises that will help solidify Caroline’s understanding of bow distribution, as well as using the new detaché stroke. There are four basic bow distribution exercises that I like to do – usually as part of the weekly scale assignment.

4 BOW DISTRIBUTION EXERCISES

In this video I am working with Caroline on these four exercises, using the G-scale from that week’s lesson. In the segment at the end she played the last exercise in the following lesson, with that week’s A-flat scale. The dotted rhythms are still a “work in progress”, which will be addressed more in the variations in the next blog.

You will have noticed that I mentioned the word “proprioception”, which Caroline knew from our Saturday Pre-College Cello Class. All my own private students participate in this Pre-College class, and I invite any other cellists who are studying regularly with other teachers to join in. There are usually about 15 cellists participating (some come from as far away as Greenville or Myrtle Beach – three hours away), and we have a final concert each semester with solo repertoire and cello choir pieces. I had discussed Proprioception in some of the recent classes and given the students some exercises to help them understand the concept of where in space their arm or hand must be  – without holding the cello or the bow. In other words, they should understand what third-extended position feels like without the cello, or where their hand should be when they are at the tip on the A-string, or how the wrist looks and feels when they are at the frog on the C-string.

Variation #13:

Var 13

This variation builds on #12, but with the addition of bow distribution, left/right motion, and a special focus on the contact point. This variation is quite tricky. The 16th notes need a slightly higher contact point, while the quarter notes need a lower contact point (“the more notes in a bow, the lower the contact point”). Then there is the problem of playing with the same kind of detaché at the frog and the tip. In addition, coordinating left/right motion and vibrato makes for a huge package of coordination issues!

I like to think of these variations as little “gems” – each one needs to be burnished and polished so it shines. In order to do that one has to understand all the technical issues involved, and then solve them.

Variation #14:Var 14

This variation presents another contact point “puzzle” with three different strokes (detaché, staccato and full bow). The c.p. should be higher for the quarter note (fast bow speed going all the way to the tip). Some editions of the Feuillard are missing dots on some of the eighth notes (see above).

By the way, you may have noticed that Caroline plays all these variations from memory. While I don’t specifically ask the students to consciously “memorize” the theme they usually can play it from memory anyway after a few lessons, and I encourage them to do so. By playing it from memory they can focus more on the bow and all the specific problems in each variation.

Variations #15-17:

These three variations have similar issues to the previous ones. One of the problems with #15 is that people tend to put an accent on the eighth note. The pulse should be on the first note of each group, and the eighth note should have a nice “float” even though it is short and staccato.

Var 15

Variation #16 has a similar problem to #11. The two quarter notes need to have a lower contact point in order to get a full sound. The shorter notes require a faster bow speed and therefore they need a slightly higher contact point. The goal is to get the same sound at the frog and at the tip for those shorter notes (and not to accent the eighth note, as in the previous variation).

Var 16

Variation #17 is again to be played in the middle of the bow, with the lower arm. The eighth notes need to have a nice “float” sound and not be played too short.

Var 17

Next week’s blog will work with several variations that deal with dotted rhythms, building on the dotted rhythms that we had seen in Variation #8.

Blog 9 – Feuillard No. 32 – Variations #18-21

Today’s blog is devoted entirely to dotted rhythms, building on the elements of Variation #8 that we had encountered earlier on the page in Feuillard No. 32. As I mentioned in that earlier discussion, dotted rhythms are notoriously difficult for string players. We tend to play triplets instead of the correct dotted rhythm.

This is an example of how logically and well organized Mr. Feuillard’s exercises are presented. The one dotted rhythm example earlier in No. 32 helped Caroline to become familiar with the basic issues involved in playing this rhythm. Now that the fundamentals are more secure, a few weeks later, Feuillard adds complexity. There will be more dotted rhythms coming up in No. 33, which will again add to the mix.

Variation #18:

Var 18

Another problem for cellists in playing dotted rhythms is that we tend to get physically tired from the “exertion” that is involved in producing this stroke. The solution to this part of the problem is to train ourselves to relax physically during the subdivided beat.  I find it useful to ask the students to say the word “relax” in a rhythmical way – this helps with the subdivision and it also helps with relaxing the arm. It is an interesting coordination exercise, but once the students can say the word “relax”, with the “láx” syllable on the subdivision, then the next step is to really relax the muscles while saying the word and playing the notes. This exercise helps to train the physical release of the muscles.

relax

The idea is to consciously relax the muscles of the arm during the longer note, and then to come back into the string in order to articulate the shorter note. This takes a good amount of training, concentration, and repetition to internalize all the elements – but it is worth the time and effort to have this tool in our technical toolbox.

One other concept that I like to discuss with the students at this point is “double-dotting”. Most of the younger students are not familiar with this stylistic feature of the Baroque, and it is time to acquaint them with it. I also want the students to start listening to lots of literature, so I usually ask them to find some recordings of double-dotting in performances of pieces by Lully, Couperin and Rameau.

Many years ago I started working with a talented student who was then in the fifth grade, Wade Davis. I presented the idea of “double-dotting” and asked him if he was aware of this concept. He said “of course”, and proceeded to give me a lecture on the French Baroque, the French overture style, Lully, Couperin and Rameau, and the Bach Fifth Suite. He later went on to the North Carolina School of the Arts, and Peabody – and specializes now as a Baroque cellist. Who would have predicted that…?  You can visit Wade’s website at: wadedaviscello.weebly.com

Variation #19:

Var 19

This variation is more complex by adding some other elements, including bow distribution, contact point issues, and being able to make the same kind of sound at the frog and the tip. Caroline and I worked quite a bit on this variation, tearing it apart and then putting it together again. I asked her to repeat it the next week, and she improved it a lot.

Variations #20-21

Var 20-21

As you have seen in previous blogs, I ask the students to write in their tempos for each variation (and for etudes and pieces) while they are working on them at home. This helps me know if they are thinking about the tempos in a healthy way, and helps me address issues of rhythm and pulse. It is also a good way to maintain consistency between the practice sessions and the lesson. If a student comes in playing a variation (or an etude or piece) at a tempo that is too fast for them to handle, I can check to see if they are just being nervous, or if they were playing too fast because they were conceiving the tempo at that speed.

In the case of Caroline’s Variation #20 I wanted her to feel the larger pulse of the quarter note rather than the smaller pulse of the eighth note:

I was especially impressed with Caroline’s #21 because that variation is particularly difficult for most people, and I usually expect that it will take a few lessons to get it right. When Caroline played it correctly on the first try I wanted to give her my signature “handshake” for having succeeded in something really well.

As I work with the students on all these Feuillard exercises I am interested in knowing how they feel about what we are doing. Some students seem to love doing this detailed and intense work. Others find it “boring” or don’t understand the need for it.  In any case, I like to find out what they are thinking about their work on the Feuillard and then discuss it with them. In Caroline’s case, she is making good progress, but I wasn’t sure if she enjoys this work or not. So, I asked her:

In the next Blog we will work with the specialty strokes in Variations #22-26: up-bow staccato and sautillé.

Blog 10: No. 32 – Variations #22-26

With the next several variations we are getting into some specialized strokes that are used for virtuosic playing: the hooked staccato and sautillé . By working on these strokes at this point in their development the students are laying the groundwork for having the ability to use these bowings in pieces in the future . But I feel that they are really important for reasons other than the virtuosic nature of the strokes.

Variations #22-24:

Var 22-24

There are four different names for the stroke that is used in Variations #22-24: “up-bow staccato”, “down-bow staccato”, “hooked staccato” and “slurred staccato”. Different people use different terms, and the students should be familiar with all of them.  As I explain to the students, these variations are specialty strokes that are used for pieces such as in the Locatelli sonata. I usually demonstrate and ask them to listen to a recording of the Locatelli.

I like to tell them that these are essentially virtuosic strokes, and so they are not very important right now, but then I like to say that they are actually very important right now, emphasizing the irony. I ask them why these variations are really quite important, to see if they understand the main issues: equal bow distribution for all the notes, and the ability to attain the same focused sound throughout the bow so they are capable of playing with that sound anywhere on the bow.

In working on these variations I want to make sure that the students are also observing the difference between the last notes of variations #22 (an eighth note and an eighth rest) and #23 (a quarter note). We need to sharpen their ability to read and interpret accurately what they see on the page.

At the end of this session I again asked Caroline to challenge herself and play it faster (she said that she got it up to 52 here, but it would be good for her to play it much faster in preparation for the real virtuosic up-bow staccato that happens in the literature). This stroke will come back again in Feuillard No. 33 and I hope by that time she will have a good, clean, fast up-bow staccato.

I also mentioned the famous Heifetz Hora Staccato, which was one of his signature encore pieces. This is the up-bow and down-bow staccato par excellence. You can see it here at: https://www.youtube.com/watch?v=Mag2mc5Vva0

Variations #25 and #26:

Var 25-26

These two variations work with the sautillé stroke. Sautillé means to “hop” or “skip” in French. My working definition of the stroke is that it is a “fast, uncontrolled spiccato”. In other words, it is a bouncy off-the-string stroke, but instead of controlling each bounce, the bow hops off the string by means of its own natural elasticity.

I enjoy teaching sautillé because there are so many different ways to approach it pedagogically. Some students respond to one preparatory exercise, and others respond to other ways of approaching it. Many advanced players have told me that they have a difficult time producing a sautillé stroke. But with the right approach I have found that everyone can create a good sautillé. It just takes finding what works, and then giving it a bit of time and space. Learning sautillé is a multi-week project for most students, and they must be patient through the process.

The best overall approach is to slowly creep up to a sautillé before the student even knows it is happening. That happens if they do scales every day with a spiccato bowing, and then every week in the lesson. I start students right away with a slow spiccato at 60 to the pulse doing duplex, triplets, 16th notes, sextuplets and octuplets. By the time they are doing the sextuplets and octuplets in the scale they are already doing a basic sautillé stroke. Sometimes I play the off-the-string scale rhythms in the lessons with the students in thirds:

By doing the scale this way, by the time we reach variations #25 and #26 the students already have a natural approach to playing sautillé without even realizing it. Then it is just a matter of their understanding what they are doing, and knowing how to improve and vary it.

So Caroline has been playing a basic sautillé stroke in her scales for about 2 months, since starting lessons with me. In this next lesson with Caroline, I give her some of the basic information that she will need for improving the stroke.

In the following lesson I asked Caroline to snap her tempo before playing – I find it useful to see if students can imagine the tempo that they have been using in practicing. That insures that they have played enough repetitions at a given tempo, and that they can predict how fast they are supposed to play. It also helps to internalize the tempo before playing it. Caroline played the variation, and then we talked about speeding it up to a goal tempo. Then for the next lesson Caroline increased the tempo.

Up until this point we are still going for the “big picture” here – just trying to play the basic stroke and trying to get the tempo up a bit. We have not yet delved into the details of how to actually improve the stroke. Now we will need to improve the sound, the evenness of the rhythm, the height of the bounce, and one of the main things for creating a good sautillé –  finding how to stay out of one’s own way.

There are several exercises that can help students study these various aspects of the sautillé stroke. The first of these is what I call the “bouncy bow” exercise. With this exercise I try to help the student find the natural bounce of the bow.  By just letting it bounce from fairly high above the string, the bow will rebound. This is the only time that we start a stroke from above the string – and it is only an exercise. Normally every stroke starts from the string.

We set the metronome at 60 to the pulse, and then do duples, triplets, sixteenth notes, sextuplets and octuplets. This is similar to the ‘off the string’ scale routine mentioned above, but it works differently. We are just exploring the natural bounce of the bow, and we are looking for a ringing, resonant sound.

Caroline had difficulty with this in this lesson. It was hard for her to “let go” and not control the bow. She was pushing down, rather than letting the bow just drop. This video is pretty long – about 8 minutes – because I want to show you how I try to present, analyze and work through the various issues that come up with this stroke. At one point I got up and played it on her cello in order to let her hear how it would sound under her ear. As you will see in the following video,  it took another week for her to absorb this information – but at the end she got it.

Another exercise that helps students to understand that the bow has its own bounce is the so-called Bubble Exercise. This exercise demonstrates that the bow has its own natural bounce, and the best thing for us to do is not to do anything! The bow will bounce by itself if we stay out of the way! (the metronome was still going when I demonstrated this exercise! Sorry if that is annoying!)

Another approach to training the sautillé also works with the groupings of 2,3,4,6, and 8 strokes, but this time starting from the string:

In this next video Caroline applied the exercises to the Feuillard #25 and #26. By this time she had increased the tempo up to 65 or so. As always I ask the students to write the tempos that they are doing on the page, so that I can see where they think they are. Sometimes I have to ask them to erase a few numbers and go back to a slower tempo to fix some aspect of the strokes; then they can move it up again.

I remember Paul Katz telling me in a lesson that there isn’t just one type of spiccato or sautillé, but an infinite variety of these strokes, and one has to find the “right” one for any given passage of music. So, this is still a work-in-progress for Caroline. But she now has a good basic understanding of the stroke, which will be further refined several months later when she gets to the Feuillard Theme No 33,  Variations #31 and #32 , and then again in the Theme No. 36, Variation #42.

In next week’s blog, we will explore ballistics, and the strokes that combine the upper arm and the wrist.  Understanding and executing these circular motions will also help to improve the sautillé stroke.

Blog 31: Feuillard No. 36 – Theme and Variations #1 – #9

The final Theme and set of bowing variations in Feuillard is No. 36. This page deals with string crossings involving four strings. There are double stops, chords, various bowings, articulation issues, and different strokes. I use No.36 to reinforce many of the concepts from the earlier pages, and especially the “twist motion”. The student should be aware of how the left arm moves in tandem with the string crossings, so that the elbow is higher on the C-string and lowest on the A-string. The student must also be aware that the contact point needs to change when going from the lower strings to the higher strings.  The “rule” is:

“The Higher the String, the Lower the Contact Point”

If we don’t pay attention to the contact point, the intonation will suffer (e.g. what I call “bow intonation”). In other words, the contact point must get lower when going to the higher string. Otherwise the notes may sound like they are out of tune when the real problem might be that the contact point is too high and the bow is bending the string, thus producing a change in the pitch.

I first ask the student to play the Theme of No.36 as chords, paying attention to the intonation.  The bottom double stop is played like a pickup to the top double stop. If a pianist were to play an accompaniment, he would come in with the top part of the chord.

The videos in this blog, and subsequent blogs dealing with No. 36, all feature my student George. He has been my student for two years.

Theme No. 36:

Theme No. 36

Variation #1:

Var 1

The goal in Variation #1 is to use the full bow, with the twist motion helping to make it easier to get weight into the lower strings and to be able to bow out (away from the body)  as we get to the tip, especially on the A-string. One must always find the most relaxed place at the frog, with the muscles releasing tension. The Left/Right Motion is again helpful with getting a good sound at the tip.

Variations #2 – #4:

Var 2   Var 3   Var 4

The goals of Variations #2-#4 are all similar: full bow, twist motion, contact point, core sound:

Variation #5:

var 5

This variation, and the next several, all deal with double stops in various ways. One must always monitor the bow angle going to the tip to make sure that the sound is consistent. The most efficient motion of the arm involves going “out”, rather than going “up” to the next higher string. This way the angle is correct, and we are also not fighting gravity. Instead of an “up” motion we use an “out” motion of the arm.

Variation #6:

Var 6

Another way to save energy as you go out to the tip is to keep the string vibrating  through “friction” and bow speed rather than using weight. The sound should continue spinning out. However, one must be careful to listen well so that the sound does not diminuendo as you get further out.

Variation #7: 

Var 7

These double stops are tricky for the left hand – especially the top parts of the chords.  We must be careful not to press down on the string with the left hand, using arm weight rather than force. The fourth finger is usually the weakest finger, and many people need some isometric exercises to help strengthen it and keep the joints from collapsing. This theme has a lot of 5ths on the top, so it is worth spending some time doing exercises for the fourth finger playing 5ths: e.g. scales in fourths and fifths, and shifts using these intervals.

Variations #8 and #9:


Needless to say, George plays each one of these variations in its entirety during the lesson. I am just saving time (and bandwidth!) by cutting them short and combining several here, since they all deal with the same issues.

Next week we will continue our journey through Feuillard No. 36 with Variations #10 – #29 on string crossings over four strings. Many of these variations are about sustaining the sound with legato or detaché strokes.

css.php